
如何运行 Nuclei

Nuclei 模板提供两种主要的执行方法:

支持的输入格式

Nuclei 支持各种输入格式来运行模板,包括 urls、hosts、ips、cidrs、asn、openapi、swagger、proxify、burpsuite 导出数据等。要了解更多关于使用输入指定选项的信息,可以参考 nuclei 输入格式 这些输入可以使用 -l-input-mode 标志提供给 nuclei。
  -l, -list string              包含要扫描的目标 URL/主机列表的文件路径(每行一个)
  -im, -input-mode string       输入文件模式 (list, burp, jsonl, yaml, openapi, swagger)(默认为 "list")
对一组输入(urls、hosts、ips、cidrs、asn)执行 nuclei 就像运行以下命令一样简单:
  nuclei -l targets.txt
对于运行其他输入格式(burp、jsonl、yaml、openapi、swagger),你可以使用 -im 标志来指定输入模式。
  nuclei -l targets.burp -im burp
  nuclei -l openapi.yaml -im openapi
等等。

执行 Nuclei 模板

-t/templates 默认模板 来自我们 nuclei-template 仓库 的大多数社区模板默认情况下都会执行,直接从标准安装路径执行。典型的命令如下:
nuclei -u https://example.com
然而,关于默认运行的模板有一些例外情况: 你也可以对 URL 列表运行模板:
nuclei -list http_urls.txt
自定义模板 要运行自定义模板目录或多个目录,请使用以下命令结构:
nuclei -u https://example.com -t cves/ -t exposures/
存储在 github 目录下的自定义 GitHub 仓库中的模板可以用这个命令执行:
nuclei -u https://example.com -t github/private-repo
你也可以直接从任何 ProjectDiscovery Cloud Platform URL 运行模板,如下所示:
nuclei -u https://example.com -t https://cloud.projectdiscovery.io/public/tech-detect

执行模板工作流

-w/workflows 工作流 可以使用以下命令执行:
nuclei -u https://example.com -w workflows/
同样,工作流可以针对 URL 列表执行。
nuclei -list http_urls.txt -w workflows/wordpress-workflow.yaml

模板类型

模板过滤器

Nuclei 引擎支持三种基本过滤器来自定义模板执行。
  1. 标签 (-tags) 基于模板中可用的标签字段进行过滤。
  2. 严重性 (-severity) 基于模板中可用的严重性字段进行过滤。
  3. 作者 (-author) 基于模板中可用的作者字段进行过滤。
默认情况下,过滤器应用于模板的安装路径,可以通过手动模板路径输入自定义。 例如,下面的命令将运行安装在 ~/nuclei-templates/ 目录中的所有带有 cve 标签的模板。
nuclei -u https://example.com -tags cve
这个例子将运行 ~/nuclei-templates/exposures/ 目录下所有带有 config 标签的模板。
nuclei -u https://example.com -tags config -t exposures/
多个过滤器一起工作时使用 AND 条件, 下面的例子运行所有带有 cve 标签 AND 具有 criticalhigh 严重性 AND geeknik 作为模板作者的模板。
nuclei -u https://example.com -tags cve -severity critical,high -author geeknik

高级过滤器

多个过滤器也可以使用模板条件标志 (-tc) 组合,允许复杂表达式,如下所示:
nuclei -tc "contains(id,'xss') || contains(tags,'xss')"
nuclei -tc "contains(tags,'cve') && contains(tags,'ssrf')"
nuclei -tc "contains(name, 'Local File Inclusion')"
支持的字段有:
  • id 字符串
  • name 字符串
  • description 字符串
  • tags 字符串切片
  • authors 字符串切片
  • severity 字符串
  • protocol 字符串
  • http_method 字符串切片
  • body 字符串(包含所有请求体,如果有的话)
  • matcher_type 字符串切片
  • extractor_type 字符串切片
  • description 字符串
另外,模板元数据部分的每个键值对都是可访问的。所有字段都可以与逻辑操作符(||&&)组合,并与 DSL 辅助函数一起使用。 同样,所有过滤器也支持工作流。
nuclei -w workflows/wordpress-workflow.yaml -severity critical,high -list http_urls.txt
工作流在工作流中,Nuclei 过滤器应用于通过工作流运行的模板或子模板,而不是工作流本身。

公共模板

Nuclei 内置支持从 nuclei templates 项目自动下载/更新模板,该项目提供了 社区贡献 的随时可用模板列表,这些模板会不断更新。 Nuclei 在每次执行时都会检查新的社区模板发布,并在可用时自动下载最新版本。可选择使用 -duc CLI 标志或配置文件禁用此功能。

自定义模板

用户可以在个人公共/私有 GitHub/AWS Bucket 上创建自定义模板,他们希望在任何环境中使用 nuclei 运行/更新这些模板,而无需在各处手动下载 GitHub 仓库。 要使用此功能,用户需要设置以下环境变量:
export GITHUB_TOKEN=gh_XXX
export GITHUB_TEMPLATE_REPO=my_nuclei_template
export GITLAB_SERVER_URL=https://gitlab.com
# GitLab token 必须具有 read_api 和 read_repository 权限
export GITLAB_TOKEN=XXXXXXXXXX
# 逗号分隔的仓库 ID 列表(不是名称)
export GITLAB_REPOSITORY_IDS=12345,67890
export AWS_ACCESS_KEY=AKIAXXXXXXXX
export AWS_SECRET_KEY=XXXXXX
export AWS_REGION=us-xxx-1
export AWS_TEMPLATE_BUCKET=aws_bucket_name
export AZURE_TENANT_ID=00000000-0000-0000-0000-000000000000
export AZURE_CLIENT_ID=00000000-0000-0000-0000-000000000000
export AZURE_CLIENT_SECRET=00000000-0000-0000-0000-000000000000
export AZURE_SERVICE_URL=https://XXXXXXXXXX.blob.core.windows.net/
export AZURE_CONTAINER_NAME=templates
也可以提供环境变量以禁用从默认和自定义模板位置下载:
# 禁用从默认 nuclei-templates 项目下载
export DISABLE_NUCLEI_TEMPLATES_PUBLIC_DOWNLOAD=true

# 禁用从公共/私有 GitHub 项目下载
export DISABLE_NUCLEI_TEMPLATES_GITHUB_DOWNLOAD=true

# 禁用从公共/私有 GitLab 项目下载
export DISABLE_NUCLEI_TEMPLATES_GITLAB_DOWNLOAD=true

# 禁用从公共/私有 AWS Bucket 下载
export DISABLE_NUCLEI_TEMPLATES_AWS_DOWNLOAD=true

# 禁用从公共/私有 Azure Blob Storage 下载
export DISABLE_NUCLEI_TEMPLATES_AZURE_DOWNLOAD=true
一旦设置了环境变量,执行以下命令下载自定义模板:
nuclei -update-templates
此命令将克隆包含自定义模板的仓库到默认的 nuclei 模板目录($HOME/nuclei-templates/github/)。 自定义模板的目录结构如下所示:
tree $HOME/nuclei-templates/

nuclei-templates/
└── github/$GH_REPO_NAME # 从公共/私有 GitHub 项目下载的自定义模板
└── gitlab/$GL_REPO_NAME # 从公共/私有 GitLab 项目下载的自定义模板
└── s3/$BUCKET_NAME # 从公共/私有 AWS Bucket 下载的自定义模板
└── azure/$CONTAINER_NAME # 从公共/私有 Azure Blob Storage 下载的自定义模板
然后用户可以使用 -t 标志使用自定义模板,如下所示:
nuclei -t github/my_custom_template -u https://example.com
nuclei 引擎可以使用 -update 标志更新到最新版本。
编写自己的独特模板将使你始终领先于他人。

AI 驱动的模板生成

-ai Nuclei 支持使用由 ProjectDiscovery API 提供的 AI 功能即时生成和运行模板。此功能允许你通过自然语言描述你想要检测的内容,执行快速、有针对性的扫描,而无需预先编写的模板。 前提条件:
  1. ProjectDiscovery API 密钥(在 cloud.projectdiscovery.io 获取)
  2. 使用以下方法之一配置 API 密钥: 方法 1:使用 CLI(推荐)
    nuclei -auth
    # 在提示时输入你的 API 密钥
    
    方法 2:环境变量
    export PDCP_API_KEY=your_api_key_here
    
基本用法:
  1. 查找敏感信息泄露:
nuclei -list targets.txt -ai "Find admin_api_key in response"
  1. 检测调试信息:
nuclei -list targets.txt -ai "Detect exposed stack traces in error messages"
  1. 发现管理员接口:
nuclei -list targets.txt -ai "Find admin login endpoints"
  1. 识别暴露的密钥:
nuclei -list urls.txt -ai "Detect secrets in response"
  1. 提取页面标题
nuclei -list targets.txt -ai "Extract page titles"
-ai 标志需要活跃的互联网连接以与 ProjectDiscovery API 通信。生成的模板会同时存储在你的计算机本地和你的 ProjectDiscovery 云账户中以供将来参考。为了保护隐私,你的提示和生成的模板不会用于 AI 训练。目前,每个用户每天限制 100 个 AI 模板生成查询。这个限制可能会根据使用模式和防止滥用而变化。

Nuclei 标志

nuclei -h
这将显示工具的帮助信息。以下是它支持的所有开关。
Nuclei 是一个快速的、基于模板的漏洞扫描器,专注于
广泛的可配置性、大规模的可扩展性和易用性。

用法:
  nuclei [flags]

标志:
TARGET:
   -u, -target string[]          要扫描的目标 URL/主机
   -l, -list string              包含要扫描的目标 URL/主机列表的文件路径(每行一个)
   -eh, -exclude-hosts string[]  从输入列表中排除扫描的主机(ip、cidr、主机名)
   -resume string                使用 resume.cfg 恢复扫描(将禁用聚类)
   -sa, -scan-all-ips            扫描与 dns 记录关联的所有 IP
   -iv, -ip-version string[]     要扫描的主机名的 IP 版本(4,6)-(默认为 4)

TARGET-FORMAT:
   -im, -input-mode string        输入文件模式(list、burp、jsonl、yaml、openapi、swagger)(默认为 "list")
   -ro, -required-only            生成请求时仅使用输入格式中的必需字段
   -sfv, -skip-format-validation  解析输入文件时跳过格式验证(如缺少变量)

TEMPLATES:
   -nt, -new-templates                    仅运行最新的 nuclei-templates 版本中添加的新模板
   -ntv, -new-templates-version string[]  运行在特定版本中添加的新模板
   -as, -automatic-scan                   使用 wappalyzer 技术检测到标签映射的自动 web 扫描
   -t, -templates string[]                要运行的模板或模板目录列表(逗号分隔、文件)
   -turl, -template-url string[]          模板 url 或包含模板 url 的列表(逗号分隔、文件)
   -w, -workflows string[]                要运行的工作流或工作流目录列表(逗号分隔、文件)
   -wurl, -workflow-url string[]          工作流 url 或包含工作流 url 的列表(逗号分隔、文件)
   -validate                              验证传递给 nuclei 的模板
   -nss, -no-strict-syntax                禁用模板上的严格语法检查
   -td, -template-display                 显示模板内容
   -tl                                    列出所有可用模板
   -sign                                  使用 NUCLEI_SIGNATURE_PRIVATE_KEY 环境变量中定义的私钥签署模板
   -code                                  启用加载基于代码协议的模板
   -dut, -disable-unsigned-templates      禁止运行未签名的模板或签名不匹配的模板

FILTERING:
   -a, -author string[]               基于作者运行模板(逗号分隔、文件)
   -tags string[]                     基于标签运行模板(逗号分隔、文件)
   -etags, -exclude-tags string[]     基于标签排除模板(逗号分隔、文件)
   -itags, -include-tags string[]     即使默认或配置中排除的标签也要执行
   -id, -template-id string[]         基于模板 ID 运行模板(逗号分隔、文件、允许通配符)
   -eid, -exclude-id string[]         基于模板 ID 排除模板(逗号分隔、文件)
   -it, -include-templates string[]   要执行的模板文件或目录路径,即使默认或配置中排除
   -et, -exclude-templates string[]   要排除的模板文件或目录路径(逗号分隔、文件)
   -em, -exclude-matchers string[]    结果中排除的模板匹配器
   -s, -severity value[]              基于严重性运行模板。可能的值:info、low、medium、high、critical、unknown
   -es, -exclude-severity value[]     基于严重性排除模板。可能的值:info、low、medium、high、critical、unknown
   -pt, -type value[]                 基于协议类型运行模板。可能的值:dns、file、http、headless、tcp、workflow、ssl、websocket、whois、code、javascript
   -ept, -exclude-type value[]        基于协议类型排除模板。可能的值:dns、file、http、headless、tcp、workflow、ssl、websocket、whois、code、javascript
   -tc, -template-condition string[]  基于表达条件运行模板

OUTPUT:
   -o, -output string           要写入已发现问题/漏洞的输出文件
   -sresp, -store-resp          将通过 nuclei 传递的所有请求/响应存储到输出目录
   -srd, -store-resp-dir string 将通过 nuclei 传递的所有请求/响应存储到自定义目录(默认为 "output")
   -silent                      仅显示发现
   -nc, -no-color               禁用输出内容着色(ANSI 转义码)
   -j, -jsonl                   以 JSONL(ines) 格式写入输出
   -irr, -include-rr -omit-raw  包括请求/响应对在 JSON、JSONL 和 Markdown 输出中(仅限发现)[已弃用使用 -omit-raw](默认 true)
   -or, -omit-raw               在 JSON、JSONL 和 Markdown 输出中省略请求/响应对(仅限发现)
   -ot, -omit-template          在 JSON、JSONL 输出中省略编码模板
   -nm, -no-meta                禁用打印结果元数据在 cli 输出中
   -ts, -timestamp              在 cli 输出中启用打印时间戳
   -rdb, -report-db string       nuclei 报告数据库(始终使用此持久报告数据)
   -ms, -matcher-status         显示匹配失败状态
   -me, -markdown-export string  目录导出结果在 markdown 格式中
   -se, -sarif-export string     文件导出结果在 SARIF 格式中
   -je, -json-export string      文件导出结果在 JSON 格式中
   -jle, -jsonl-export string    文件导出结果在 JSONL(ine) 格式中

CONFIGURATIONS:
   -config string                       路径到 nuclei 配置文件
   -fr, -follow-redirects               启用 http 模板跟随重定向
   -fhr, -follow-host-redirects         在同一主机上跟随重定向
   -mr, -max-redirects int              最大 http 模板跟随重定向数(默认 10)
   -dr, -disable-redirects              禁用 http 模板重定向
   -rc, -report-config string            nuclei 报告模块配置文件
   -H, -header string[]                 要包含在所有 http 请求中的自定义头/cookie(cli、文件)
   -V, -var value                       自定义 vars 在 key=value 格式中
   -r, -resolvers string                包含 nuclei 解析器的解析器列表文件
   -sr, -system-resolvers               使用系统 DNS 解析作为错误回退
   -dc, -disable-clustering             禁用请求聚类
   -passive                             启用被动 HTTP 响应处理模式
   -fh2, -force-http2                   强制 http2 连接请求
   -ev, -env-vars                       启用环境变量以在模板中使用
   -cc, -client-cert string             客户端证书文件(PEM 编码)用于验证扫描的主机
   -ck, -client-key string              客户端密钥文件(PEM 编码)用于验证扫描的主机
   -ca, -client-ca string               客户端证书颁发机构文件(PEM 编码)用于验证扫描的主机
   -sml, -show-match-line               显示文件模板匹配行,仅适用于提取器
   -ztls                                使用 ztls 库与自动回退到标准库进行 tls13 [已弃用] 默认启用 ztls
   -sni string                           tls sni 主机名以使用(默认:输入域名)
   -dt, -dialer-timeout value           网络请求超时时间。
   -dka, -dialer-keep-alive value       网络请求保持活动时间。
   -lfa, -allow-local-file-access       允许文件(有效载荷)访问系统上的任何位置
   -lna, -restrict-local-network-access  阻止连接到本地 / 私有网络
   -i, -interface string                要用于网络扫描的网络接口
   -at, -attack-type string             要执行的有效载荷组合类型(batteringram、pitchfork、clusterbomb)
   -sip, -source-ip string              要用于网络扫描的源 ip 地址
   -rsr, -response-size-read int        最大响应大小读取字节数(默认 10485760)
   -rss, -response-size-save int        最大响应大小读取字节数(默认 1048576)
   -reset                               重置删除所有 nuclei 配置和数据文件(包括 nuclei-templates)
   -tlsi, -tls-impersonate              启用实验客户端 hello(ja3)tls 随机化

INTERACTSH:
   -iserver, -interactsh-server string  interactsh 服务器 url 用于自托管实例(默认:oast.pro,oast.live,oast.site,oast.online,oast.fun,oast.me)
   -itoken, -interactsh-token string    interactsh 服务器认证令牌用于自托管 interactsh 服务器
   -interactions-cache-size int        要保留在交互缓存中的请求数(默认 5000)
   -interactions-eviction int          要等待从缓存中逐出请求的秒数(默认 60)
   -interactions-poll-duration int     要等待每次交互轮询请求的秒数(默认 5)
   -interactions-cooldown-period int   交互轮询退出前的额外时间(默认 5)
   -ni, -no-interactsh                 禁用 interactsh 服务器用于 OAST 测试,排除 OAST 基于模板

FUZZING:
   -ft, -fuzzing-type string  覆盖模板设置的模糊类型(replace, prefix, postfix, infix)
   -fm, -fuzzing-mode string  覆盖模板设置的模糊模式(multiple, single)
   -fuzz                     启用加载模糊模板

UNCOVER:
   -uc, -uncover                 启用 uncover 引擎
   -uq, -uncover-query string[]   uncover 搜索查询
   -ue, -uncover-engine string[]  uncover 搜索引擎(shodan,censys,fofa,shodan-idb,quake,hunter,zoomeye,netlas,criminalip,publicwww,hunterhow)(默认 shodan)
   -uf, -uncover-field string     uncover 要返回的字段(ip,port,host)(默认 "ip:port")
   -ul, -uncover-limit int        uncover 结果返回(默认 100)
   -ur, -uncover-ratelimit int   覆盖未知 ratelimit 的引擎 ratelimit(默认 60 req/min)(默认 60)

RATE-LIMIT:
   -rl, -rate-limit int              要发送的请求总数每秒(默认 150)
   -rlm, -rate-limit-minute int      每分钟要发送的请求数
   -bs, -bulk-size int               每个模板要并行分析的最大主机数(默认 25)
   -c, -concurrency int              要并行执行的最大模板数(默认 25)
   -hbs, -headless-bulk-size int     每个模板要并行分析的最大无头主机数(默认 10)
   -headc, -headless-concurrency int 要并行执行的最大无头模板数(默认 10)
   -jsc, -js-concurrency int         要并行执行的最大 javascript 运行时数(默认 120)
   -pc, -payload-concurrency int     每个模板的最大有效载荷并发数(默认 25)

OPTIMIZATIONS:
   -timeout int                    等待秒数在超时之前(默认 10)
   -retries int                    要重试失败的请求次数(默认 1)
   -ldp, -leave-default-ports      离开默认 HTTP/HTTPS 端口(例如:host:80,host:443)
   -mhe, -max-host-error int       主机扫描前最大错误数(默认 30)
   -te, -track-error string[]      将给定错误添加到 max-host-error 监视列表中(标准、文件)
   -nmhe, -no-mhe                  禁用从扫描中跳过主机基于错误
   -project                        使用项目文件夹以避免多次发送相同请求
   -project-path string            设置特定项目路径 
   -spm, -stop-at-first-match      停止处理 HTTP 请求,在第一次匹配后(可能会破坏模板/工作流逻辑)
   -stream                         流模式 - 开始不排序输入
   -ss, -scan-strategy value        扫描时要使用的策略(auto/host-spray/template-spray)(默认 auto)
   -irt, -input-read-timeout value  输入读取超时(默认 3m0s)
   -nh, -no-httpx                  禁用 httpx 探测非 url 输入
   -no-stdin                       禁用 stdin 处理

HEADLESS:
   -headless                       启用需要无头浏览器支持的模板(root 用户在 Linux 上将禁用沙盒)
   -page-timeout int               无头模式下等待每页秒数(默认 20)
   -sb, -show-browser              在运行带有无头模式的模板时显示浏览器
   -ho, -headless-options string[]  启动带有附加选项的无头 chrome
   -sc, -system-chrome             使用本地安装的 Chrome 浏览器而不是 nuclei 安装的
   -lha, -list-headless-action     列出可用无头操作

DEBUG:
   -debug                   显示所有请求和响应
   -dreq, -debug-req        显示所有发送的请求
   -dresp, -debug-resp      显示所有接收到的响应
   -p, -proxy string[]      要使用的 http/socks5 代理列表(逗号分隔或文件输入)
   -pi, -proxy-internal     代理所有内部请求
   -ldf, -list-dsl-function  列出所有支持的 DSL 函数签名
   -tlog, -trace-log string  要写入发送请求跟踪日志的文件
   -elog, -error-log string  要写入发送请求错误日志的文件
   -version                 显示 nuclei 版本
   -hm, -hang-monitor       启用 nuclei 挂起监控
   -v, -verbose             显示详细输出
   -profile-mem string      可选 nuclei 内存配置文件转储
   -vv                      显示扫描加载的模板
   -svd, -show-var-dump     显示调试变量转储
   -ep, -enable-pprof       启用 pprof 调试服务器
   -tv, -templates-version  显示已安装 nuclei-templates 的版本
   -hc, -health-check       运行诊断检查

UPDATE:
   -up, -update                     更新 nuclei 引擎到最新发布的版本
   -ut, -update-templates           更新 nuclei-templates 到最新发布的版本
   -ud, -update-template-dir string  自定义目录安装 / 更新 nuclei-templates
   -duc, -disable-update-check       禁用自动 nuclei/templates 更新检查

STATISTICS:
   -stats                   显示扫描运行统计信息
   -sj, -stats-json         以 JSONL(ines) 格式显示统计信息
   -si, -stats-interval int  显示统计更新之间等待的秒数(默认 5)
   -mp, -metrics-port int    暴露 nuclei 指标的端口(默认 9092)

CLOUD:
   -auth                 配置 projectdiscovery cloud(pdcp)api 密钥(默认 true)
   -cup, -cloud-upload   上传扫描结果到 pdcp 仪表板
   -sid, -scan-id string  上传扫描结果到给定扫描 id

AUTHENTICATION:
   -sf, -secret-file string[]  路径到包含 nuclei 认证扫描秘密的配置文件
   -ps, -prefetch-secrets      从秘密文件中预取秘密
从 Nuclei v3.0.0 -metrics 端口已删除并合并到 -stats 当使用 -stats 标志时,默认情况下可用 metrics 可用 localhost:9092/metrics 和 metrics-port 可以配置使用 -metrics-port 标志

速率限制

Nuclei 有多个速率限制控制多个因素,包括要并行执行的模板数量、每个模板要并行扫描的主机数量以及你想使用 nuclei 发送/限制的全局请求数量/每秒,这里是每个标志的示例描述。
标志描述
rate-limit控制要每秒发送的总请求数
bulk-size控制每个模板要并行处理的主机数量
c控制要并行处理的模板数量
随意调整这些标志以调整你的 nuclei 扫描速度和准确性。有关调整这些标志的更多详细信息,可以参考 mass-scanning-cli
rate-limit 标志优先于其他两个标志,无论 cbulk-size 标志的值如何, 请求/秒数量不能超过为 rate-limit 标志定义的值。

流量标记

许多 BugBounty 平台/项目要求你标识你发送的 HTTP 流量,这可以通过在 $HOME/.config/nuclei/config.yaml 配置文件或 CLI 标志 -H / header 中设置自定义头来实现
使用配置文件设置自定义头
# Headers to include with each request.
header:
  - 'X-BugBounty-Hacker: h1/geekboy'
  - 'User-Agent: Mozilla/5.0 (Windows NT 10.0; WOW64) / nuclei'
使用 CLI 标志设置自定义头
nuclei -header 'User-Agent: Mozilla/5.0 (Windows NT 10.0; WOW64) / nuclei' -list urls.txt -tags cves

模板排除

Nuclei 支持各种方法来排除/阻止模板执行。默认情况下,nuclei 排除下面列出的标签/模板,以避免意外的基于模糊的扫描和一些不应进行大规模扫描的模板,这些可以通过 nuclei 配置文件/标志轻松覆盖。 Nuclei 引擎支持两种手动从扫描中排除模板的方法,
  1. 排除模板 (-exclude-templates/exclude) exclude-templates 标志用于排除单个或多个模板和目录,可以使用多个 -exclude-templates 标志提供多个值。
  2. 排除标签 (-exclude-tags/etags) exclude-tags 标志用于基于定义的标签排除模板,可以使用单个或多个来排除模板。
排除单个模板的示例
nuclei -list urls.txt -t cves/ -exclude-templates cves/2020/CVE-2020-XXXX.yaml
多个模板排除的示例
nuclei -list urls.txt -exclude-templates exposed-panels/ -exclude-templates technologies/
排除带有单个标签的模板的示例
nuclei -l urls.txt -t cves/ -etags xss
排除带有多个标签的模板的示例
nuclei -l urls.txt -t cves/ -etags sqli,rce
  • .nuclei-ignore 列表 - 默认情况下从 nuclei 扫描中排除的标签和模板的默认列表。
.nuclei-ignore 文件不应由用户修改,因为它由 nuclei 内部使用,要覆盖忽略列表,请使用 nuclei 配置 文件。
要优先考虑某些模板或标签,你必须使用 -include-templates-include-tags 标志。这将确保指定的模板或标签优先于任何 .nuclei-ignore 或 denylist 条目。
运行被阻止模板的示例
nuclei -l urls.txt -include-tags iot,misc,fuzz
执行 denylist 中特定模板的示例假设你在 Nuclei 配置文件的 denylist 中有全局匹配 (*) 的自定义模板。
# ...

exclude-templates:
  - 'custom/**/*.yaml'
但你只想执行一个特定的模板。
nuclei -l urls.txt -include-templates custom/specific-template.yaml

列出模板路径

Nuclei 中的 -tl 选项用于列出模板的路径,而不是执行它们。这可以帮助你检查给定当前模板过滤器的情况下,将使用哪些模板进行扫描。
# 列出模板的命令 (-tl)
nuclei -tags cve -severity critical,high -author geeknik -tl

在互联网数据库上扫描

Nuclei 支持与 uncover 模块 集成,该模块支持 Shodan、Censys、Hunter、Zoomeye 等服务,以在这些数据库上执行 Nuclei。 以下是 uncover 选项的使用方法 -
nuclei -h uncover

UNCOVER:
   -uc, -uncover                  启用 uncover 引擎
   -uq, -uncover-query string[]   uncover 搜索查询
   -ue, -uncover-engine string[]  uncover 搜索引擎 (shodan,shodan-idb,fofa,censys,quake,hunter,zoomeye,netlas,criminalip) (默认 shodan)
   -uf, -uncover-field string     uncover 返回字段 (ip,port,host) (默认 "ip:port")
   -ul, -uncover-limit int        uncover 返回结果数量 (默认 100)
   -ucd, -uncover-delay int       uncover 查询请求之间的延迟(秒)(0 表示禁用) (默认 1)
你需要在 shell 中将使用的引擎的 API 密钥设置为环境变量。
export SHODAN_API_KEY=xxx
export CENSYS_API_ID=xxx
export CENSYS_API_SECRET=xxx
export FOFA_EMAIL=xxx
export FOFA_KEY=xxx
export QUAKE_TOKEN=xxx
export HUNTER_API_KEY=xxx
export ZOOMEYE_API_KEY=xxx
所需的 API 密钥可以通过在以下平台注册获取 ShodanCensysFofaQuakeHunterZoomEye 使用搜索查询执行模板的示例。
export SHODAN_API_KEY=xxx
nuclei -id 'CVE-2021-26855' -uq 'vuln:CVE-2021-26855' -ue shodan
它还可以从模板元数据读取查询并针对 uncover 返回的主机执行模板。 使用模板定义的搜索查询执行模板的示例。 CVE-2021-26855 模板片段
metadata:
  shodan-query: 'vuln:CVE-2021-26855'
nuclei -t cves/2021/CVE-2021-26855.yaml -uncover
nuclei -tags cve -uncover
我们可以更新 nuclei 配置文件,为所有扫描包含这些标签。

Nuclei 配置

v2.3.2 发布以来,nuclei 使用 goflags 提供干净的 CLI 体验和长/短格式标志。 goflags 带有自动生成的配置文件支持,可以将所有可用的 CLI 标志转换为配置文件,基本上你可以将所有 CLI 标志定义在配置文件中,以避免每次扫描 nuclei 时重复使用 CLI 标志。 nuclei 配置文件的默认路径是 $HOME/.config/nuclei/config.yaml,取消注释并配置你希望作为默认运行的标志。
这是一个示例配置文件:
# Headers to include with all HTTP request
header:
  - 'X-BugBounty-Hacker: h1/geekboy'

# Directory based template execution
templates:
  - cves/
  - vulnerabilities/
  - misconfiguration/

# Tags based template execution
tags: exposures,cve

# Template Filters
tags: exposures,cve
author: geeknik,pikpikcu,dhiyaneshdk
severity: critical,high,medium

# Template Allowlist
# 
# Note: This will take precedence over the .nuclei-ignore file and denylist
# entries (exclude-tags or exclude-templates list).
include-tags: dos,fuzz # Tag based inclusion
include-templates: # Template based inclusion
  - vulnerabilities/xxx
  - misconfiguration/xxxx

# Template Denylist
exclude-tags: info # Tag based exclusion
exclude-templates: # Template based exclusion
  - vulnerabilities/xxx
  - misconfiguration/xxxx

# Rate Limit configuration
rate-limit: 500
bulk-size: 50
concurrency: 50
一旦配置,config 文件可以作为默认值,此外可以提供自定义 config 文件使用 -config 标志。
运行 nuclei 与自定义 config 文件
nuclei -config project.yaml -list urls.txt

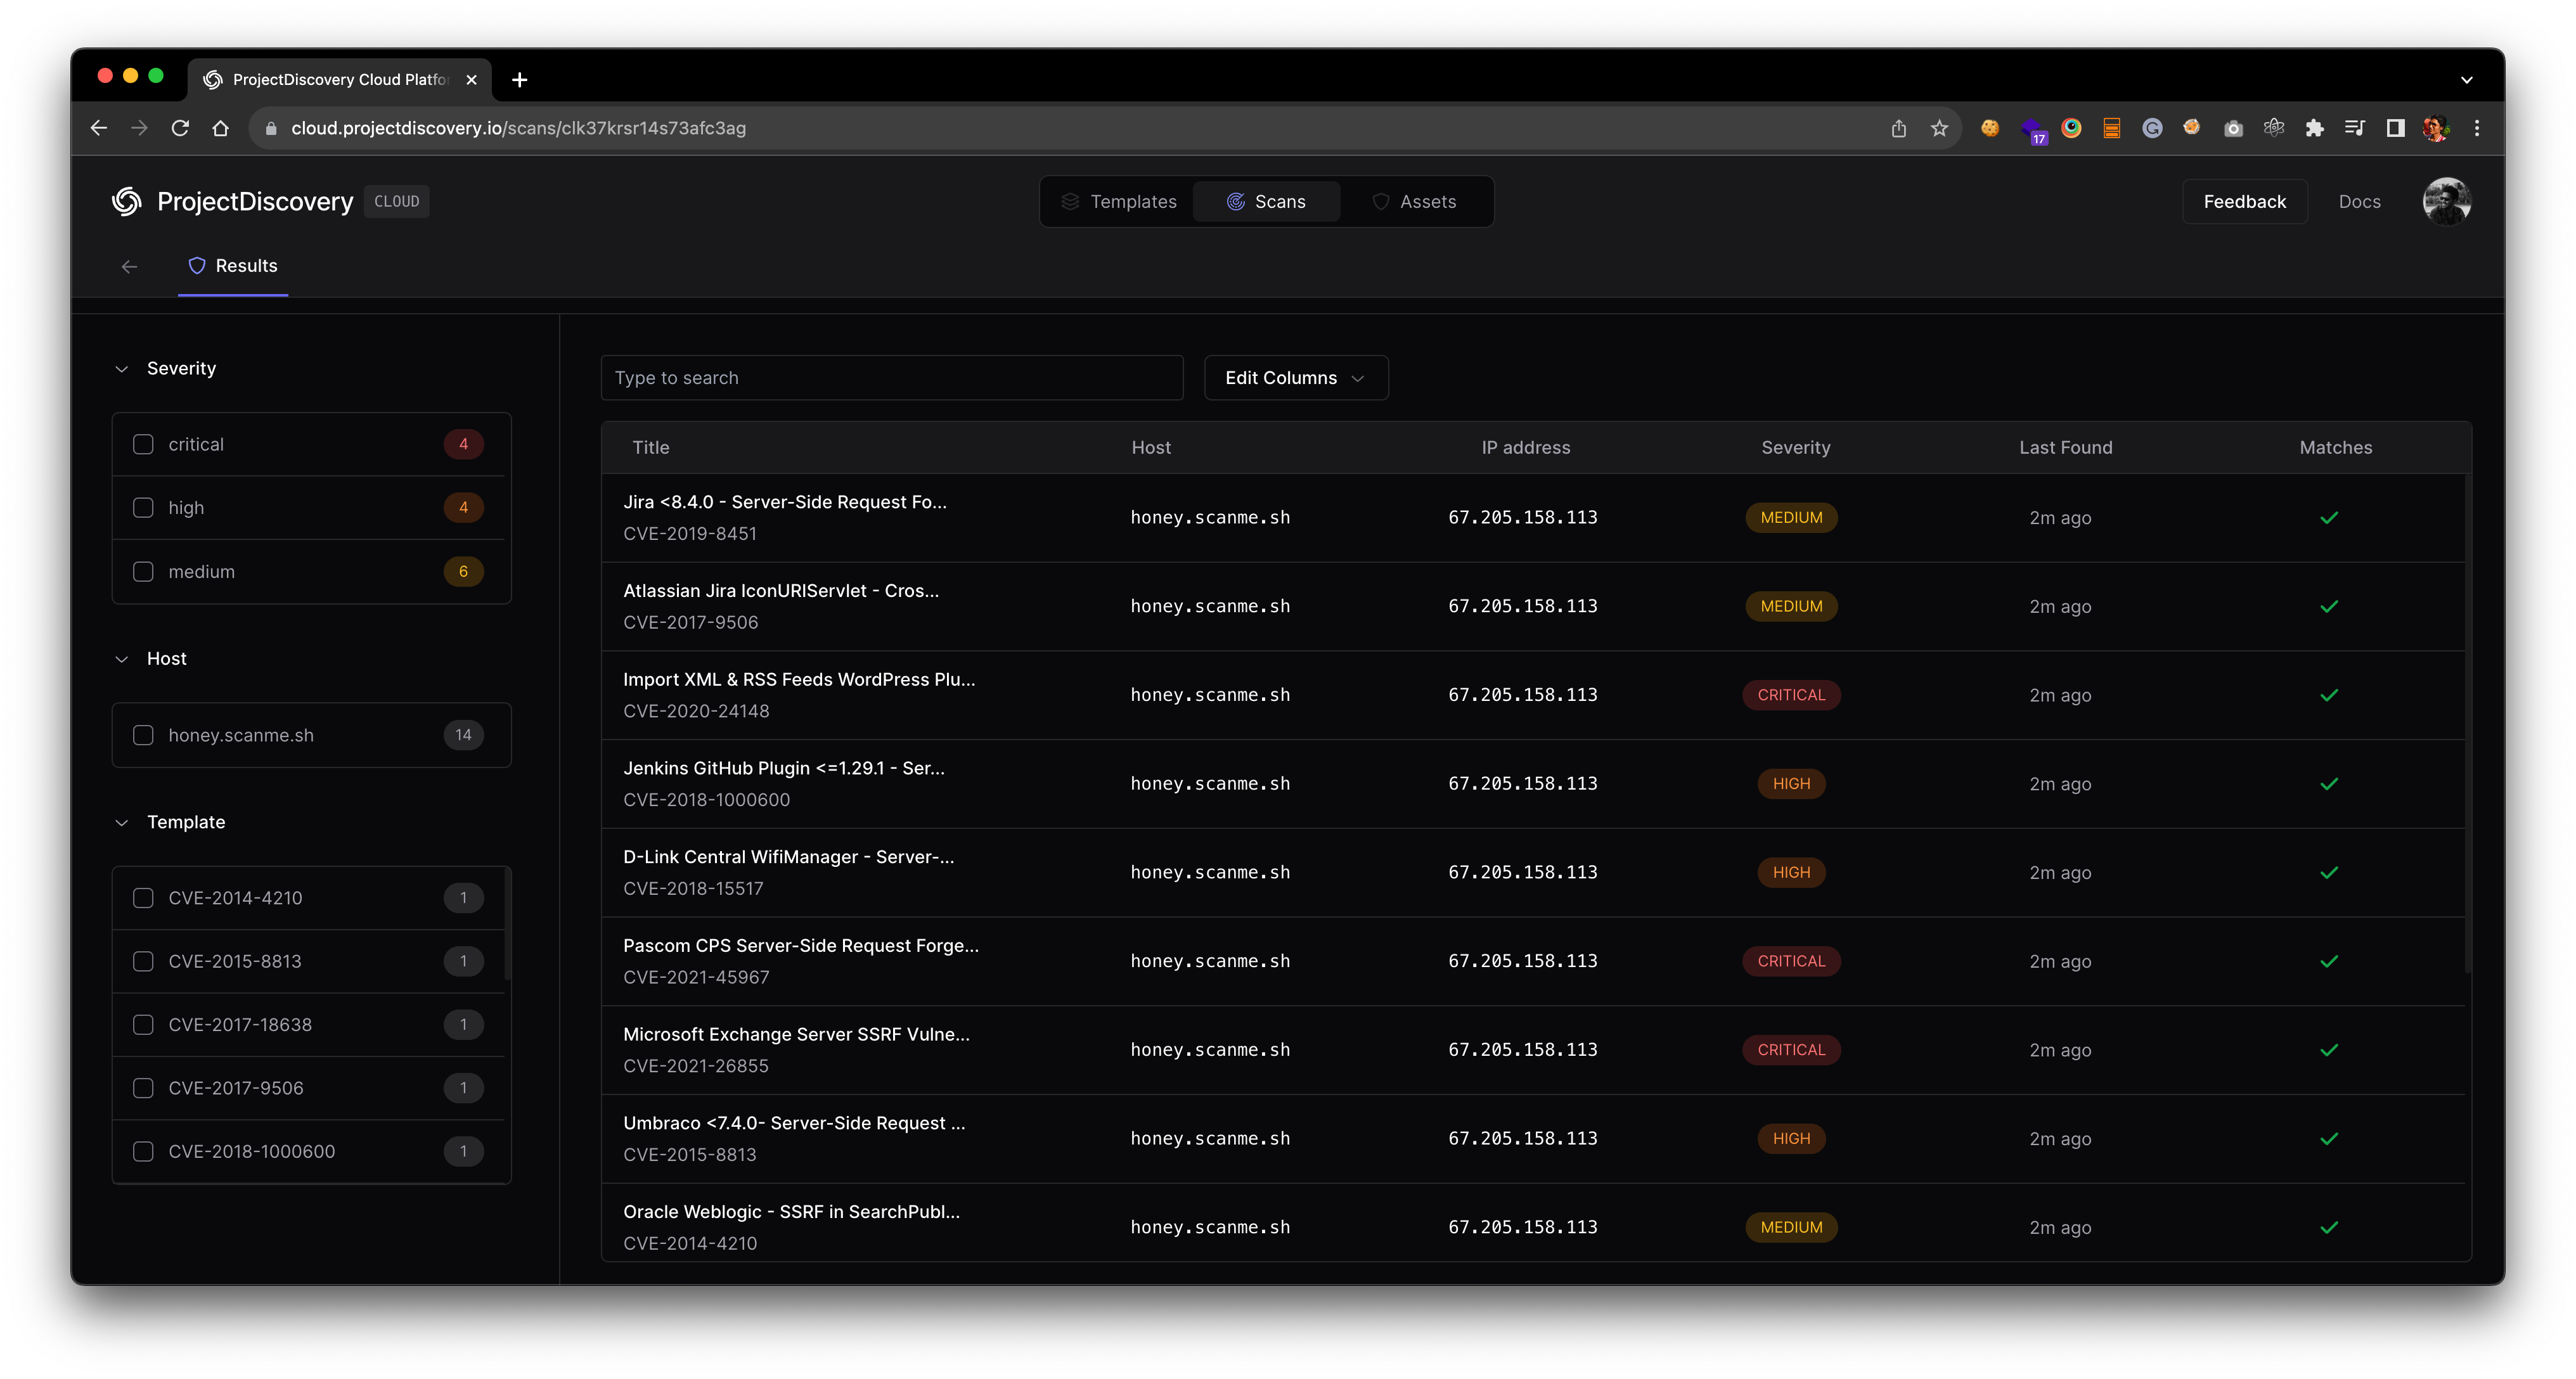
Nuclei Result Dashboard

Nuclei 现在允许与 ProjectDiscovery Cloud Platform 无缝集成,以简化 Nuclei 结果的可视化并生成快速报告。此高度请求的功能从社区中启用,以简化结果处理,只需最少努力。 按照以下步骤设置你的 PDCP Result Dashboard:
  1. 访问 https://cloud.projectdiscovery.io 以创建免费 PDCP API 密钥。
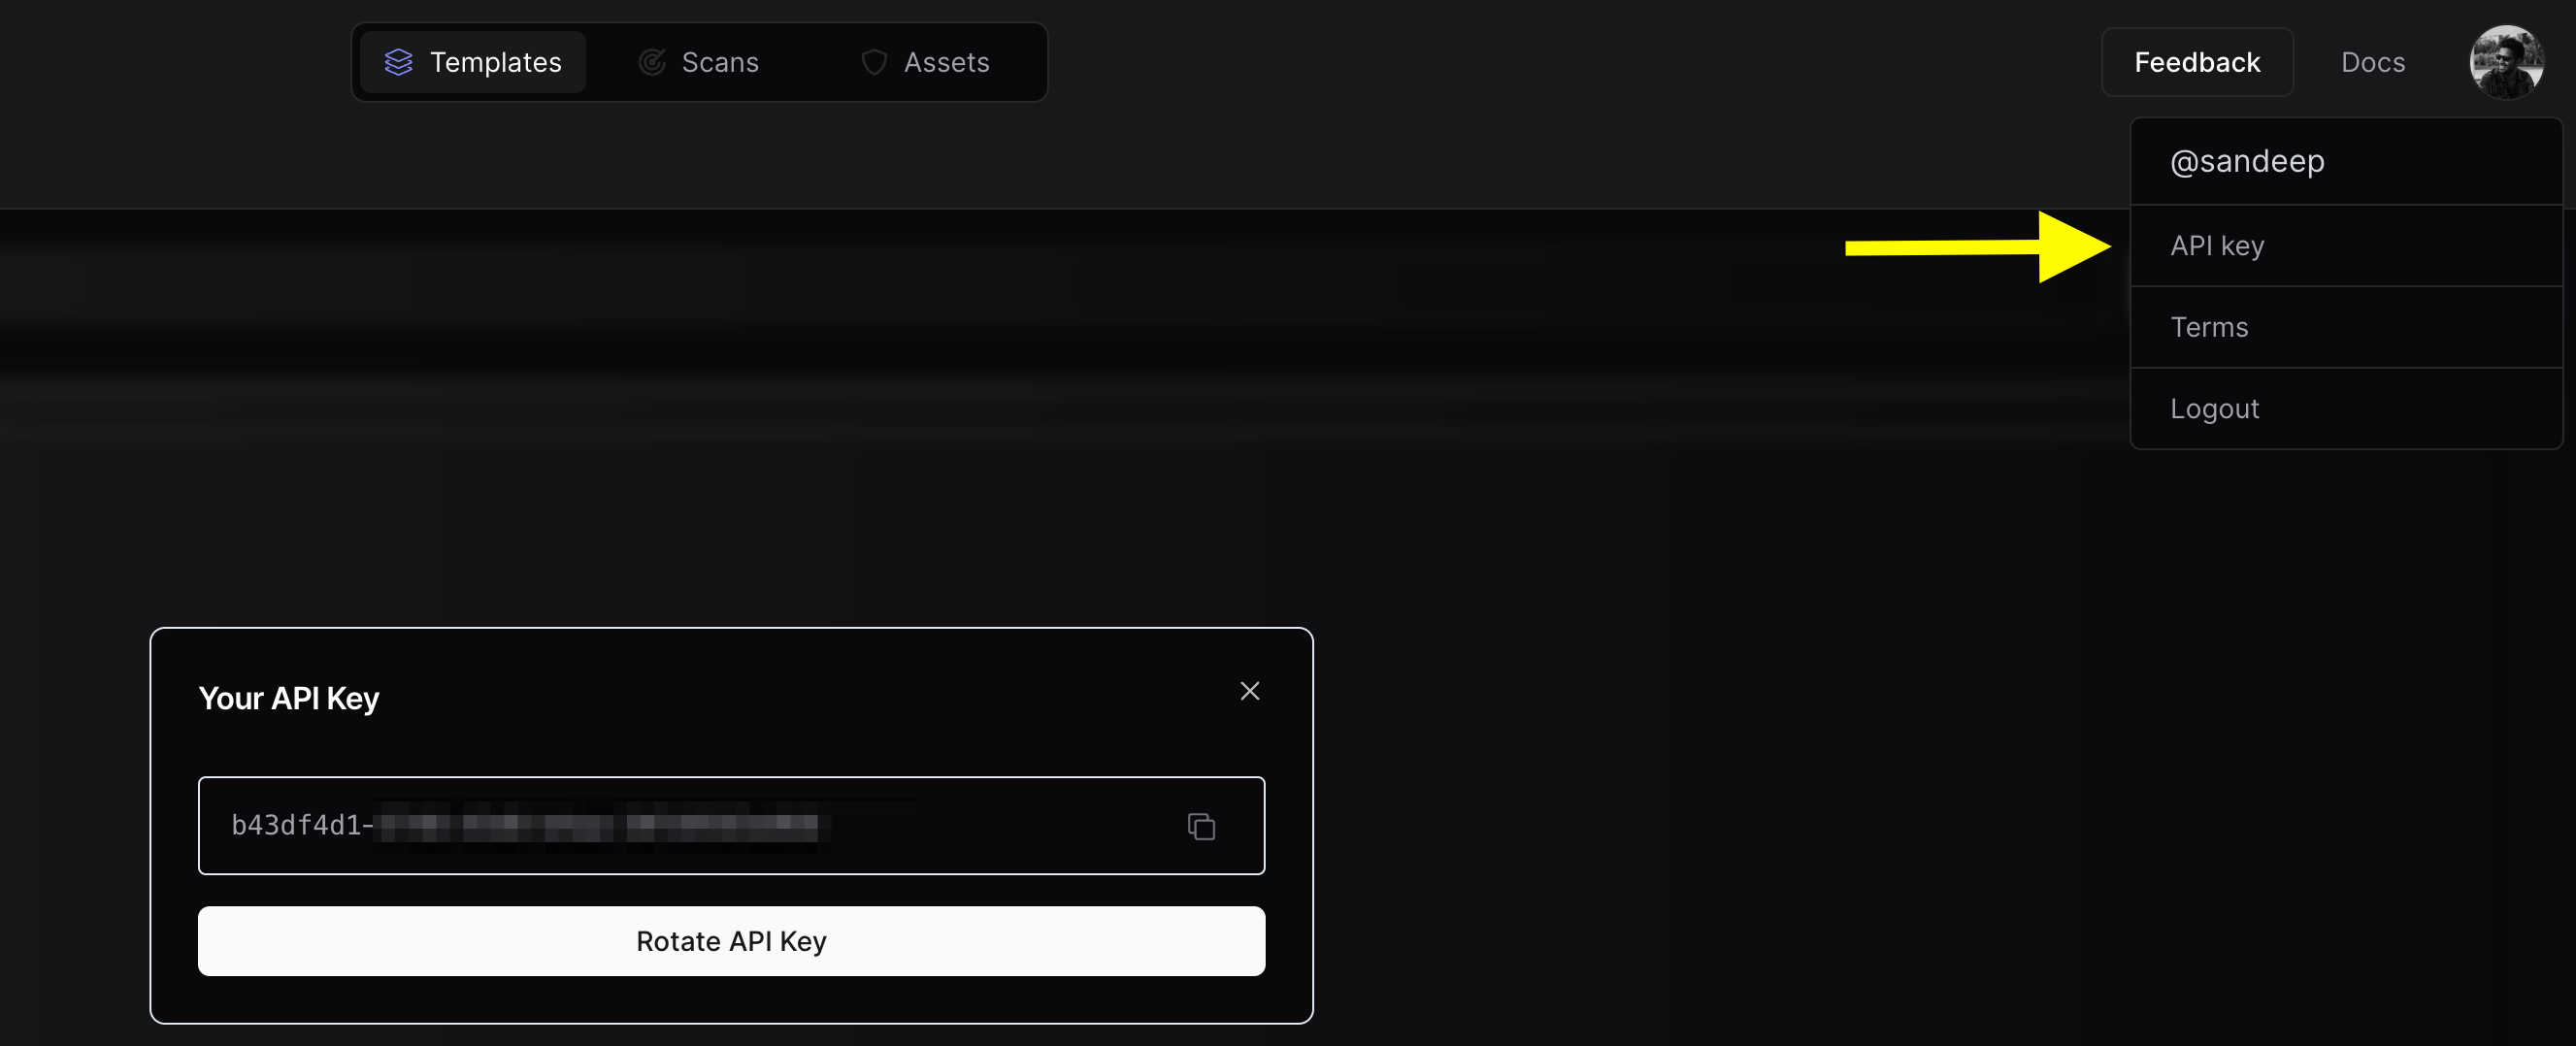
PDCP API Key
  1. 使用 nuclei -auth 命令,在提示时输入你的 API 密钥。
  2. 要执行扫描并直接上传结果到云端,请在运行 nuclei 扫描时使用 -cloud-upload 选项。
一个示例命令可能如下所示:
nuclei -target http://honey.scanme.sh -cloud-upload
并且输出将如下所示:
                     __     _
   ____  __  _______/ /__  (_)
  / __ \/ / / / ___/ / _ \/ /
 / / / / /_/ / /__/ /  __/ /
/_/ /_/\__,_/\___/_/\___/_/   v3.1.0

      projectdiscovery.io

[INF] Current nuclei version: v3.1.0 (latest)
[INF] Current nuclei-templates version: v9.6.9 (latest)
[INF] To view results on cloud dashboard, visit https://cloud.projectdiscovery.io/scans upon scan completion.
[INF] New templates added in latest release: 73
[INF] Templates loaded for current scan: 71
[INF] Executing 71 signed templates from projectdiscovery/nuclei-templates
[INF] Targets loaded for current scan: 1
[INF] Using Interactsh Server: oast.live
[CVE-2017-9506] [http] [medium] http://honey.scanme.sh/plugins/servlet/oauth/users/icon-uri?consumerUri=http://clk37fcdiuf176s376hgjzo3xsoq5bdad.oast.live
[CVE-2019-9978] [http] [medium] http://honey.scanme.sh/wp-admin/admin-post.php?swp_debug=load_options&swp_url=http://clk37fcdiuf176s376hgyk9ppdqe9a83z.oast.live
[CVE-2019-8451] [http] [medium] http://honey.scanme.sh/plugins/servlet/gadgets/makeRequest
[CVE-2015-8813] [http] [high] http://honey.scanme.sh/Umbraco/feedproxy.aspx?url=http://clk37fcdiuf176s376hgj885caqoc713k.oast.live
[CVE-2020-24148] [http] [critical] http://honey.scanme.sh/wp-admin/admin-ajax.php?action=moove_read_xml
[CVE-2020-5775] [http] [medium] http://honey.scanme.sh/external_content/retrieve/oembed?endpoint=http://clk37fcdiuf176s376hgyyxa48ih7jep5.oast.live&url=foo
[CVE-2020-7796] [http] [critical] http://honey.scanme.sh/zimlet/com_zimbra_webex/httpPost.jsp?companyId=http://clk37fcdiuf176s376hgi9b8sd33se5sr.oast.live%23
[CVE-2017-18638] [http] [high] http://honey.scanme.sh/composer/send_email?to=hVsp@XOvw&url=http://clk37fcdiuf176s376hgyf8y81i9oju3e.oast.live
[CVE-2018-15517] [http] [high] http://honey.scanme.sh/index.php/System/MailConnect/host/clk37fcdiuf176s376hgi5j3fsht3dchj.oast.live/port/80/secure/
[CVE-2021-45967] [http] [critical] http://honey.scanme.sh/services/pluginscript/..;/..;/..;/getFavicon?host=clk37fcdiuf176s376hgh1y3xjzb3yjpy.oast.live
[CVE-2021-26855] [http] [critical] http://honey.scanme.sh/owa/auth/x.js
[INF] Scan results uploaded! View them at https://cloud.projectdiscovery.io/scans/clk37krsr14s73afc3ag
扫描后,命令行界面将显示一个 URL。访问此 URL 以在云仪表板上检查结果。 PDCP Result Dashboard

高级集成选项

通过环境变量设置 API 密钥 避免通过交互提示输入 API 密钥,通过环境变量设置它。
export PDCP_API_KEY=XXXX-XXXX
启用默认结果上传 如果你希望所有扫描自动上传结果到云端,请启用 ENABLE_CLOUD_UPLOAD 环境变量。
export ENABLE_CLOUD_UPLOAD=true
禁用云上传警告 要抑制结果上传警告,请禁用 DISABLE_CLOUD_UPLOAD_WRN 环境变量。
export DISABLE_CLOUD_UPLOAD_WRN=true
你的配置 PDCP API 密钥存储在 $HOME/.pdcp/credentials.yaml
Nuclei OSS 结果上传到云平台是自动清理的,尽管此持续时间可能会根据用户反馈和要求而变化。

Nuclei Reporting

Nuclei 随 v2.3.0 发布,支持 GitHub、GitLab 和 Jira 集成,这允许 nuclei 引擎基于找到的结果在支持的平台自动创建票证。
平台GitHubGitLabJiraMarkdownSARIFElasticsearchSplunk HECMongoDB
Support
-rc, -report-config 标志可以用于提供配置文件以读取要集成的平台配置详细信息。以下是 example config file 所有支持平台。 例如,要在 GitHub 上创建票证,请创建一个配置文件,如下所示并替换适当的值:
# GitHub contains configuration options for GitHub issue tracker

github:
  username: '$user'
  owner: '$user'
  token: '$token'
  project-name: 'testing-project'
  issue-label: 'Nuclei'
  duplicate-issue-check: true
或者如果你使用 GitLab,请创建一个配置文件,如下所示并替换适当的值:
# GitLab contains configuration options for GitLab issue tracker

gitlab:
  username: '$user'
  base-url: 'gitlab.com'
  token: '$token'
  project-name: 'testing-project'
  issue-label: 'nuclei-label'
  severity-as-label: true
  duplicate-issue-check: true
要在 Elasticsearch 中存储结果,请创建一个配置文件,如下所示并替换适当的值:
# elasticsearch contains configuration options for elasticsearch exporter
elasticsearch:
  # IP for elasticsearch instance
  ip: 127.0.0.1
  # Port is the port of elasticsearch instance
  port: 9200
  # IndexName is the name of the elasticsearch index
  index-name: nuclei
要在 Splunk HEC 中转发结果,请创建一个配置文件,如下所示并替换适当的值:
# splunkhec contains configuration options for splunkhec exporter
splunkhec:
  # Hostname for splunkhec instance
  host: '$hec_host'
  # Port is the port of splunkhec instance
  port: 8088
  # IndexName is the name of the splunkhec index
  index-name: nuclei
  # SSL enables ssl for splunkhec connection
  ssl: true
  # SSLVerification disables SSL verification for splunkhec
  ssl-verification: true
  # HEC Token for the splunkhec instance
  token: '$hec_token'
要在 Jira 中转发结果,请创建一个配置文件,如下所示并替换适当的值: Jira 报告选项允许自定义字段,以及使用变量从 Nuclei 模板在那些自定义字段中。 当前支持的变量是: $CVSSMetrics, $CVEID, $CWEID, $Host, $Severity, $CVSSScore, $Name 此外,Jira 在自定义字段输入方面非常严格。如果字段是下拉菜单,Jira 只接受大小写敏感的特定字符串,并且 API 调用略有不同。为了支持这一点,有三种类型的自定义字段。
  • name 是下拉值
  • id 是下拉的 ID 值
  • freeform 如果自定义字段是文本输入,则为 true
为了避免重复,JQL 查询可以稍微修改配置文件。 JQL 查询中 CLOSED_STATUS 可以使用 status-not 变量在 Jira 模板文件中。 summary ~ TEMPLATE_NAME AND summary ~ HOSTNAME AND status != CLOSED_STATUS
jira:
  # cloud is the boolean which tells if Jira instance is running in the cloud or on-prem version is used
  cloud: true
  # update-existing is the boolean which tells if the existing, opened issue should be updated or new one should be created
  update-existing: false
  # URL is the jira application url
  url: https://localhost/jira
  # account-id is the account-id of the Jira user or username in case of on-prem Jira
  account-id: test-account-id
  # email is the email of the user for Jira instance
  email: [email protected]
  # token is the token for Jira instance or password in case of on-prem Jira
  token: test-token
  #project-name is the name of the project.
  project-name: test-project-name
  #issue-type is the name of the created issue type (case sensitive)
  # User custom fields for Jira Cloud instead
  severity-as-label: true
  # Whatever your final status is that you want to use as a closed ticket - Closed, Done, Remediated, etc
  # When checking for duplicates, the JQL query will filter out status's that match this.
  # If it finds a match _and_ the ticket does have this status, a new one will be created.
  status-not: Closed
  # Customfield supports name, id and freeform. name and id are to be used when the custom field is a dropdown.
  # freeform can be used if the custom field is just a text entry
  # Variables can be used to pull various pieces of data from the finding itself.
  # Supported variables: $CVSSMetrics, $CVEID, $CWEID, $Host, $Severity, $CVSSScore, $Name
  custom_fields:
    customfield_00001:
      name: 'Nuclei'
    customfield_00002:
      freeform: $CVSSMetrics
    customfield_00003:
      freeform: $CVSSScore
要在 MongoDB 数据库集合中写入结果,请更新配置文件以连接信息。
mongodb:
  # the connection string to the MongoDB database
  # (e.g., mongodb://root:example@localhost:27017/nuclei?ssl=false&authSource=admin)
  connection-string: ""
  # the name of the collection to store the issues
  collection-name: ""
  # excludes the Request and Response from the results (helps with filesize)
  omit-raw: false
  # determines the number of results to be kept in memory before writing it to the database or 0 to
  # persist all in memory and write all results at the end (default)
  batch-size: 0
运行 nuclei 与报告模块:
nuclei -l urls.txt -t cves/ -rc issue-tracker.yaml
同样,其他平台可以配置。报告模块还支持基本过滤和重复检查以避免重复票证创建。
allow-list:
  severity: high,critical
这将确保仅创建票证以解决 highcritical 严重性问题;同样,deny-list 可以用于排除特定严重性问题。 如果你在同一资产上运行定期扫描,你可能想要考虑 -rdb, -report-db 标志,该标志创建给定目录中有效发现的本地副本,用于报告模块以比较并 为唯一问题创建票证
nuclei -l urls.txt -t cves/ -rc issue-tracker.yaml -rdb prod
Markdown Export Nuclei 支持有效发现的有效发现导出到 markdown 格式,使用 -me, -markdown-export 标志,此标志采用目录作为输入以存储 markdown 格式报告。 包括请求/响应在 markdown 报告中是可选的,并且当与 -irr, -include-rr 标志一起使用时包括在内。
nuclei -l urls.txt -t cves/ -irr -markdown-export reports
SARIF Export Nuclei 支持有效发现的有效发现导出到 SARIF 格式,使用 -se, -sarif-export 标志。此标志采用文件作为输入以存储 SARIF 格式报告。
nuclei -l urls.txt -t cves/ -sarif-export report.sarif
也可以使用 SARIF 文件可视化 Nuclei 结果。
  1. 通过将 SARIF 文件上传到 SARIF Viewer
  2. 通过将 SARIF 文件上传到 Github Actions
更多关于 SARIF 输出的信息记录在 这里
这些是 不是 官方的 Nuclei 查看器,Nuclei 对这些选项可视化 Nuclei 结果没有责任。这些只是一些公开可用的选项来可视化 SARIF 文件。

扫描 Metrics

Nuclei 暴露运行扫描指标在本地端口 9092 当使用 -metrics 标志和可以访问 localhost:9092/metrics,默认端口暴露扫描信息是可配置使用 -metrics-port 标志。 这是一个示例查询 metrics 同时运行 nuclei 如下 nuclei -t cves/ -l urls.txt -metrics
curl -s localhost:9092/metrics | jq .
{
  "duration": "0:00:03",
  "errors": "2",
  "hosts": "1",
  "matched": "0",
  "percent": "99",
  "requests": "350",
  "rps": "132",
  "startedAt": "2021-03-27T18:02:18.886745+05:30",
  "templates": "256",
  "total": "352"
}

被动扫描

Nuclei 引擎支持被动模式扫描 HTTP 模板利用文件支持,使用此支持我们可以运行 HTTP 模板针对本地存储的 HTTP 响应数据收集自其他工具。
nuclei -passive -target http_data
Passive mode support is limited for templates having {{BasedURL}} or {{BasedURL/}} as base path.

运行 Docker

如果 Nuclei 安装在基于 installation instructions 的 Docker 容器中, 可执行文件没有主机机器的上下文。这意味着可执行文件将无法访问 本地文件,例如用于输入列表或模板。要解决此问题,容器应使用卷 映射到本地文件系统以允许访问这些文件。

基本用法

此示例运行 Nuclei 容器针对 google.com,将结果打印到 JSON 并删除容器一旦 它已经完成:
docker run --rm projectdiscovery/nuclei -u google.com -jsonl

使用卷

此示例运行 Nuclei 容器针对 URL 列表,将结果写入 .jsonl 文件并删除 容器一旦它已经完成。
# This assumes there's a file called `urls.txt` in the current directory
docker run --rm -v ./:/app/ projectdiscovery/nuclei -l /app/urls.txt -jsonl /app/results.jsonl
# The results will be written to `./results.jsonl` on the host machine once the container has completed